Choose an input pattern first
The table covers the 11 distinct spells visible across the recorded menus. The practical difference is what you must do to produce the effect: press once, hold and release, channel, block an incoming hit, or use a follow-up input. Choose a spell whose trigger you can use while watching the arena.
ZlXgames shows Steam PC v1.0.0 at startup in footage uploaded August 31, 2026. CT602’s upload is September 4; its later restart shows v1.0.2 before the extended spell selection. Earlier Epilogue 2 footage does not show its own exact build. Numbers below retain those recorded contexts.
| Spell | Input and effect | Choose it for |
|---|---|---|
| Slash | One cast hits enemies around you. | An immediate close area hit. |
| Ambush | Cross to the target’s opposite side and hit the surrounding area. | Repositioning across a target; check the landing side. |
| Sewing Wheel | Create a moving area effect that tracks the nearest enemy. | Continuing pressure while you move. |
| Counter | Time a brief block; a successful block triggers an area hit. | A known incoming attack you can time. |
| Rush | Rush forward and fire Needles; a prompt follow-up pulls Thread-linked targets. | Movement combined with Thread setup. |
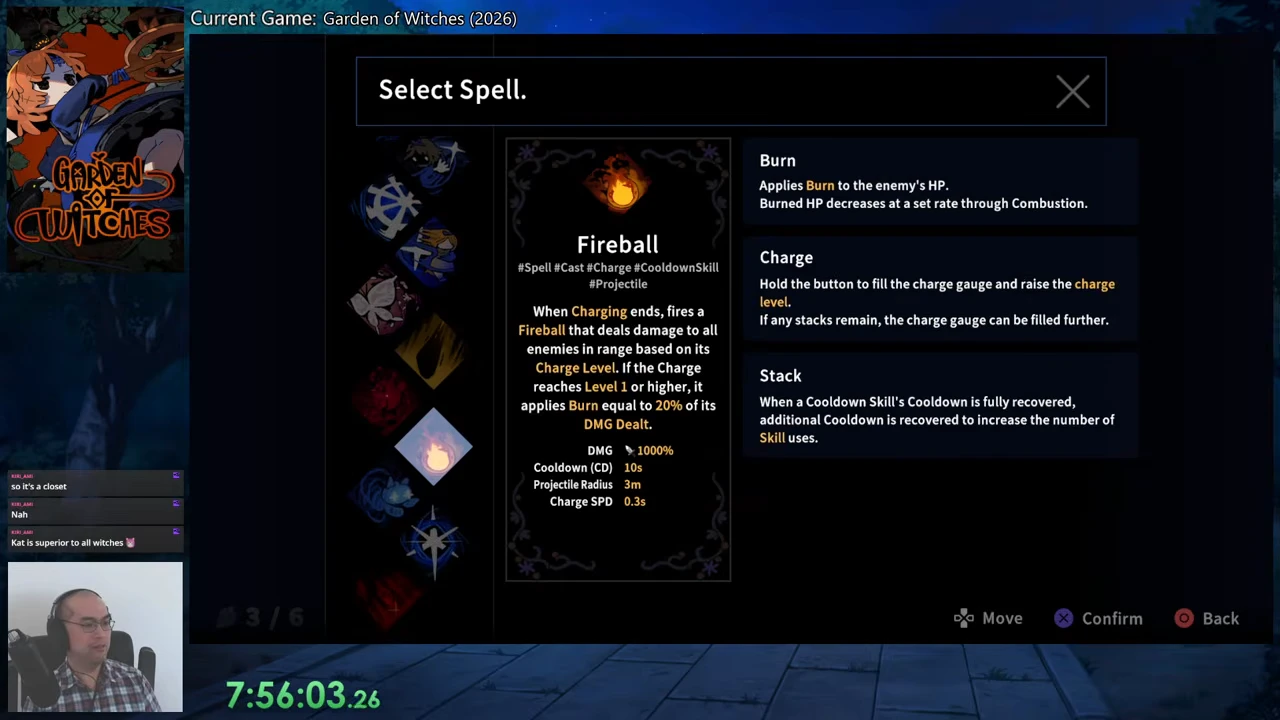
| Fireball | Charge, then release an area-damage projectile. | A prepared ranged hit and its charged Burn condition. |
| Butterfly Walk | Move while charging; release an area hit and create Flowers. | A mobile charge plus a delayed enemy-contact trap. |
| Shadow Surge | Fire a piercing projectile and create a Crow. | A direct projectile plus a short-lived summon. |
| Summon Doll | A Small Doll accompanies you; the active hit applies Mark. | A persistent companion and a timed target debuff. |
| Blood Marble | Place a lasting damage area that also produces Blood Clots. | An area enemies will remain inside. |
| Gem Shards | Channel piercing shots, then recall them when channeling ends. | Repeated hits that also recover other skill cooldowns. |
Charge, channeling and stacks are different
Fireball releases when charging ends. Its recorded v1.0.2 panel gives a 10-second cooldown and 0.3-second charge speed; reaching charge level 1 or higher adds Burn equal to 20% of the damage dealt. A quick uncharged release therefore does not establish the same Burn condition.
Gem Shards fires while you channel and hits again on recall. Its panel lists up to six shots, a 15-second cooldown and 2.5% cooldown recovery for other cooldown skills per projectile hit. Those six shots are not six equipped spell slots, and recovery requires hits.
A stack is an additional available use built through cooldown recovery. Charge level is built by holding a charge input; the charge tooltip allows further filling if stacks remain. Do not read a stock of uses as a passive charge bonus. For Butterfly Walk’s separate Flower delay, use the dedicated Flower guide.
Keep the summon and the spell hit separate
Shadow Surge’s projectile and Crow are separate damage components. The v1.0.2 tooltip creates one Crow per cast; the base Crow attacks a nearby enemy once before disappearing. Repeated casting can create new Crows, but the base panel does not promise a permanently accumulated flock.
Summon Doll instead supplies a Small Doll at battle start. Its active hit applies Mark; the recorded panel gives Mark a four-second duration and a 15% increase to damage taken. If the Small Doll is removed, the panel describes one being summoned again every three seconds. That behavior is different from a Crow’s one-attack lifetime.
Blood Marble is also a separate category: its v1.0.0 panel describes a six-second damage area and one Blood Clot every two seconds. Do not count its area effect or Clots as Crows or Dolls when choosing a summon-specific effect.
Time Counter and Rush instead of pressing twice blindly
Counter’s v1.0.0 panel gives a 0.4-second block window. Blocking an attack causes its area damage and a one-second Invincible effect. The panel says it blocks most damage; this is neither permanent protection nor a guarantee against every attack. If no attack arrives during the short window, do not assume the successful-block payoff happened.
Rush has a different second input: use it again within two seconds of the first Rush use to pull targets connected by Thread. Aim that first use so its Needles can connect, then activate the follow-up before the same two-second window ends. Its movement, Needle hits and Thread pull should not be mistaken for three independent spells.
Check access before planning around a late spell
The opening Armory shows Slash, Ambush and Sewing Wheel available, with the remaining spell icons locked. The first chapter completion displays a Blood Marble unlock; the second displays Counter. Later menus show more options, but a later visible icon alone does not establish the exact unlock event for every spell.
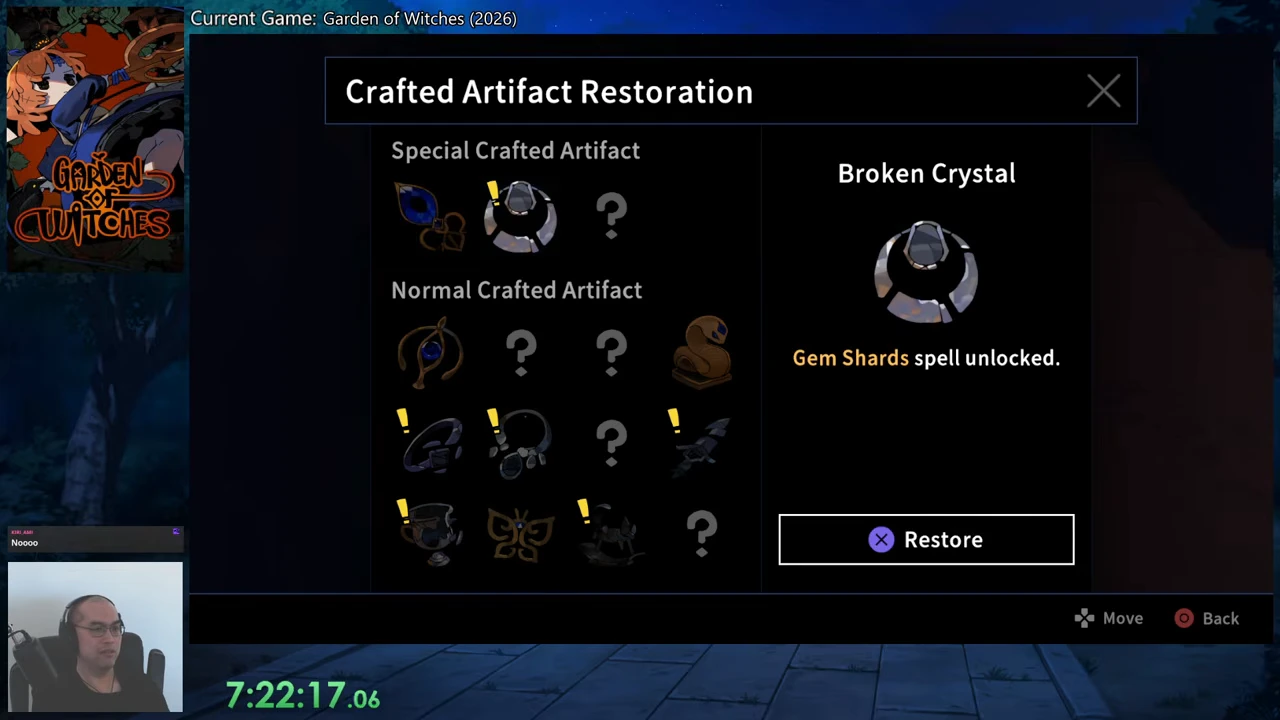
For Gem Shards, there is a specific restoration route in Epilogue 2. In the caravan, speak to the Conservator and select Broken Crystal in the Special Crafted Artifact row. Its reward is Gem Shards. Restore it, finish the completion exchange, then open the nearby Armory and select the newly available spell.
The image identifies the required artifact and reward. It does not identify a guaranteed pickup room for Broken Crystal. If that special artifact is missing, this restoration cannot yet be performed; choosing a normal artifact with a damage bonus will not unlock the spell.
- Open Crafted Artifact Restoration with the Conservator.
- Select Broken Crystal in the Special Crafted Artifact row and verify Gem Shards is the reward.
- Use the displayed Restore control and finish the completion dialogue.
- Open Armory, choose the desired spell slot, then select Gem Shards and confirm Equip.