Equip the recorded four-slot setup
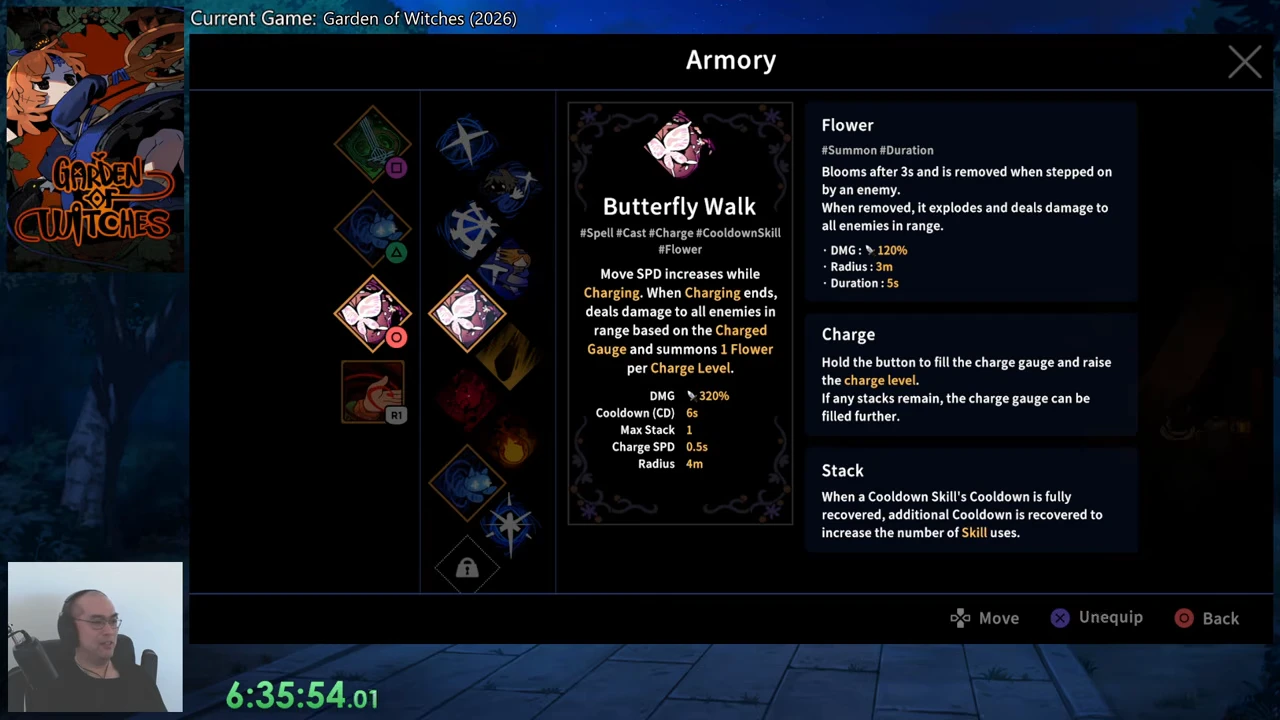
At the start of the recorded Epilogue 2 ruins route, the final Armory selection is Singing Scissors, Summon Doll, Butterfly Walk and Swamp Echo. The screenshot below shows Butterfly Walk in the equipped slot and the prompt has changed to Unequip. Earlier hovered options in the same menu are not additional equipped spells.
This is PC footage uploaded September 4, 2026, assembled from several sessions. The exact build of this earlier Epilogue 2 segment is not shown here. A later restart identifies v1.0.2, and its Butterfly Walk tooltip matches the core timing below. Treat the values as recorded menu values rather than an undated current-patch promise.
| Slot | Recorded choice | Job in this setup |
|---|---|---|
| Weapon | Singing Scissors | Loaded ranged attacks while you position for the next spell. |
| Spell | Summon Doll | A Small Doll plus an active hit that applies Mark. |
| Spell | Butterfly Walk | Move during charge, release area damage and create Flowers. |
| Special Skill | Swamp Echo | A short damage bonus when its gauge is available. |
Separate the charged release from the Flower
Hold Butterfly Walk’s assigned control while moving. Its menu says movement speed increases during charging. Release to deal the spell’s area hit and summon one Flower per charge level. The recorded base panel lists a 6-second cooldown, a 0.5-second charge speed, one maximum stack and a 4 m spell radius.
The Flower panel separately says that it blooms after three seconds and that an enemy stepping on it removes it and triggers an area explosion. These statements do not establish whether contact before blooming can trigger it. The panel also lists a 3 m radius and a five-second duration; it does not resolve whether that duration includes the bloom delay. Do not infer a mandatory three-second wait or an eight-second lifetime.
Position the release where a surviving enemy can cross the Flower. The spell’s area hit and the Flower explosion are separate damage components. A charge animation or a large yellow hit effect alone does not establish that the Flower connected.
Bank charges with the Max Stack Attribute
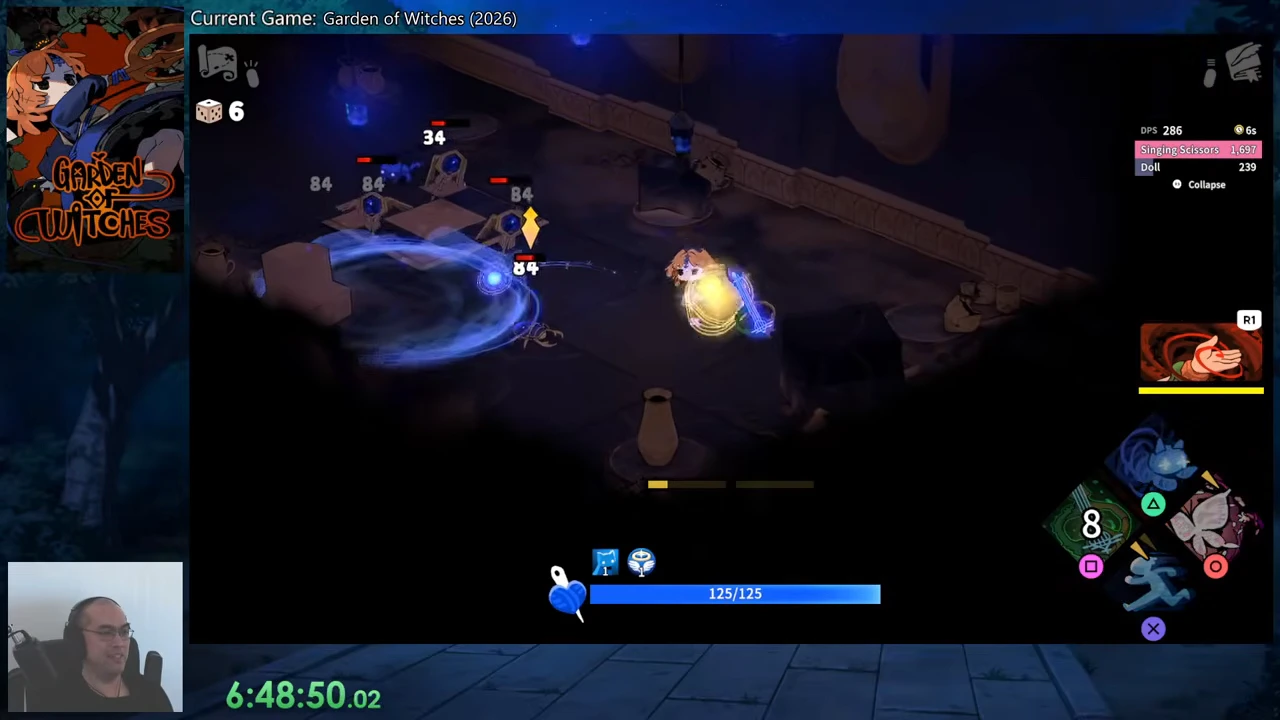
Choose Butterfly Walk’s Max Stack Attribute when you want to keep more uses available for charging. The offered upgrade below shows +1 → +2. Those are the displayed bonuses, not a change from one total stored use to two. This is an Attribute reward, not an Imprint selection.
The Stack description says that, after the skill’s cooldown fully recovers, further cooldown recovery adds stored uses. Charge can continue filling while stacks remain, and Butterfly Walk creates one Flower per charge level. Let the extra uses recover before committing to a longer charge; release early if an incoming attack makes holding unsafe. This gives the upgrade a purpose in the Flower loop rather than spending every recovered use immediately.
Darkle’s recording opens on v1.0.3_b330_Release_PC_Steam and was uploaded September 6, 2026. The image shows the option being inspected; the player then highlights Counter. The choice above is a recommendation based on the displayed effect, not a claim that this run selected it.
Pair a connecting hit with Bone Earrings
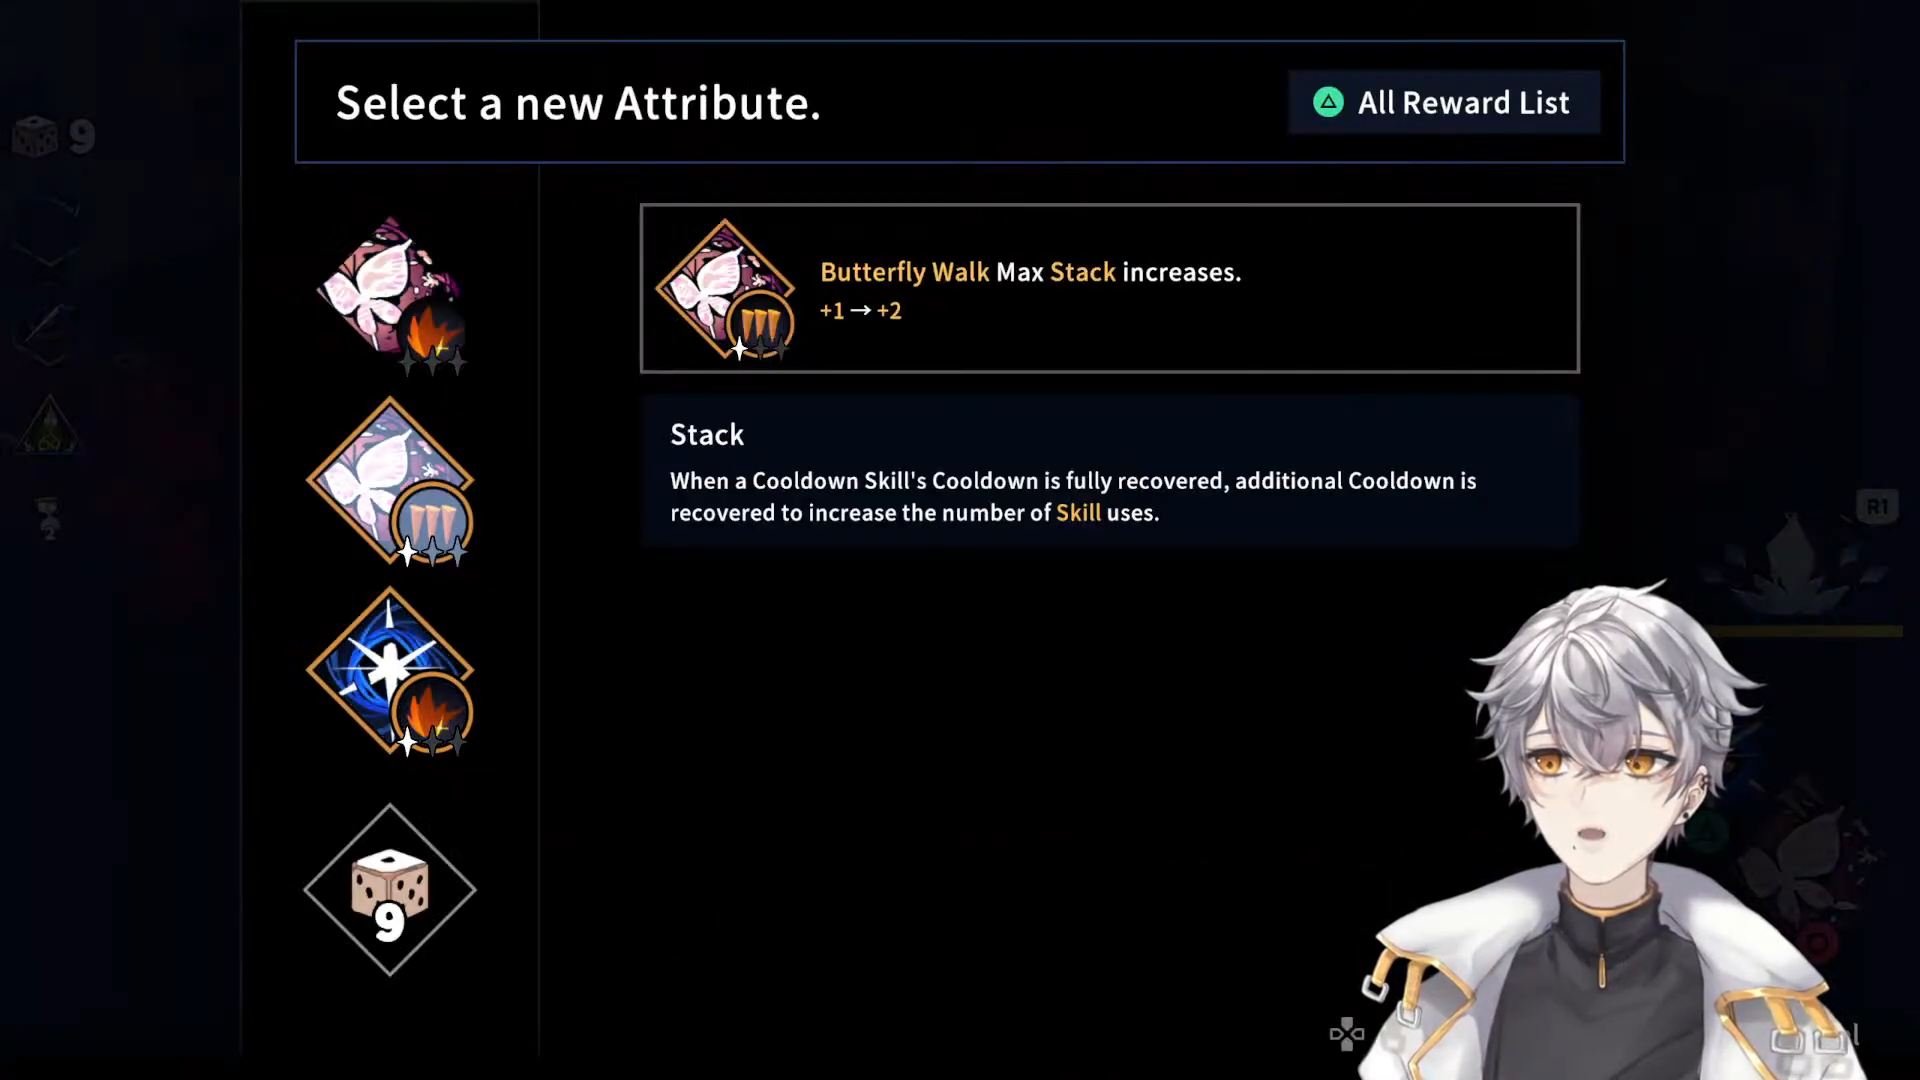
If Bone Earrings appears as a Relic reward, it fits a plan that follows Butterfly Walk with Weapon attacks. Its recorded condition is a Butterfly Walk hit: gain two Guaranteed Crit per Charged Gauge. Each Weapon use consumes one to make that attack a critical hit; the buff lasts four seconds.
With the Max Stack choice, save enough recovered uses to charge when you have room, release where the spell can hit, then use your Weapon during the crit window. More available charge supports Flower creation, while the Relic rewards the connecting spell hit and the Weapon follow-up. It does not say that the Flower explosion gains guaranteed critical hits.
This pairing is a conditional recommendation assembled from two recordings. The Bone Earrings menu comes from CT602’s earlier Epilogue 2 segment, whose exact build is not displayed; it is not a same-run demonstration with Darkle’s upgrade. Keep the starting setup working when either reward is absent.
Apply support skills when your attacks can connect
Summon Doll provides a Small Doll at the start of battle. Its active use hits the target and nearby enemies and applies Mark. The recorded Mark panel lists a four-second duration and a 15% damage-taking increase. This is a target debuff; it is not a permanent increase to Butterfly Walk’s listed damage.
Swamp Echo’s pre-run panel lists 30% increased damage for four seconds. Use it when your next attacks can land inside that window. Its short duration rewards an available target; this guide does not assume that Flower contact requires waiting for bloom.
The following sequence is author-recommended positioning and support use based on the recorded skill roles. It is not a frame-by-frame claim that the creator used this exact sequence, nor a measured maximum-damage rotation.
- Load Singing Scissors and establish space to move before starting the charge.
- Charge Butterfly Walk and release near the enemy’s expected path, without staying inside an incoming attack.
- Keep moving and keep weapon fire active; watch the enemy’s path rather than pausing for an assumed Flower waiting period.
- Use Summon Doll to apply Mark when your attacks can connect; use Swamp Echo when available and when you can use its short damage window.
- Continue firing and repeat Butterfly Walk when it is ready. If the enemy has moved away, reposition the next Flower instead of waiting beside an empty trap.
Check Flower damage separately from the spell hit
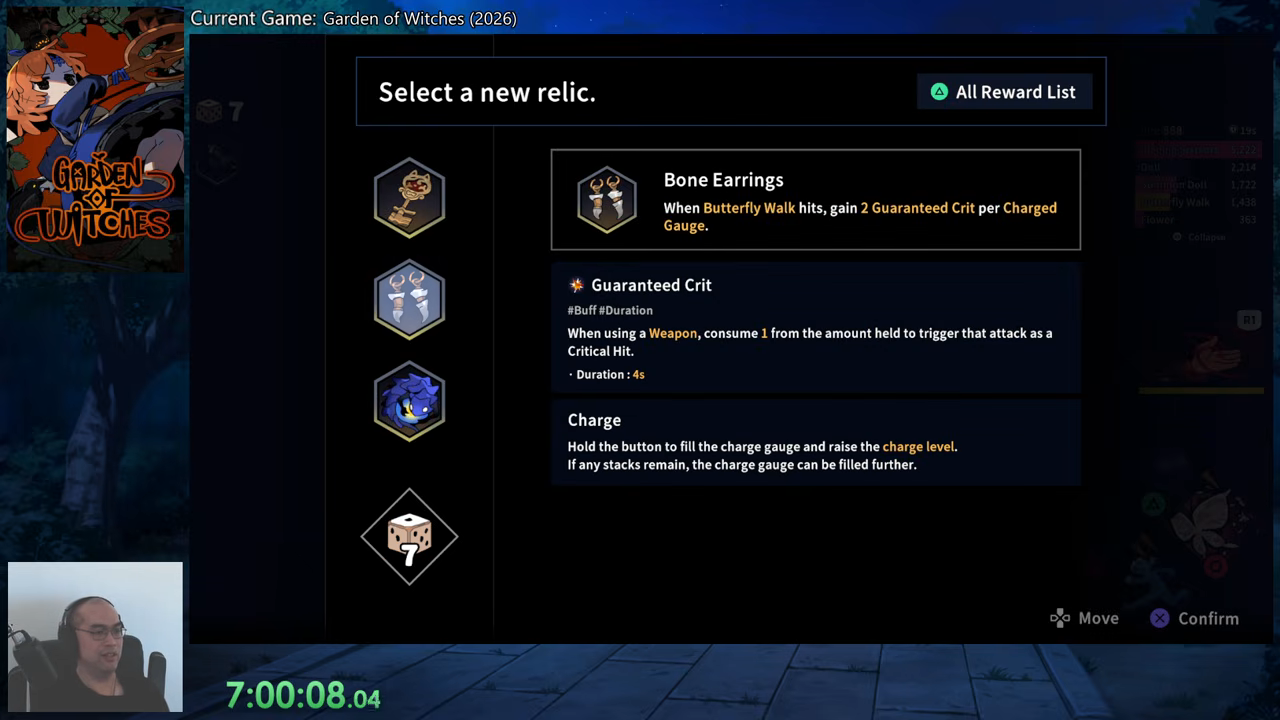
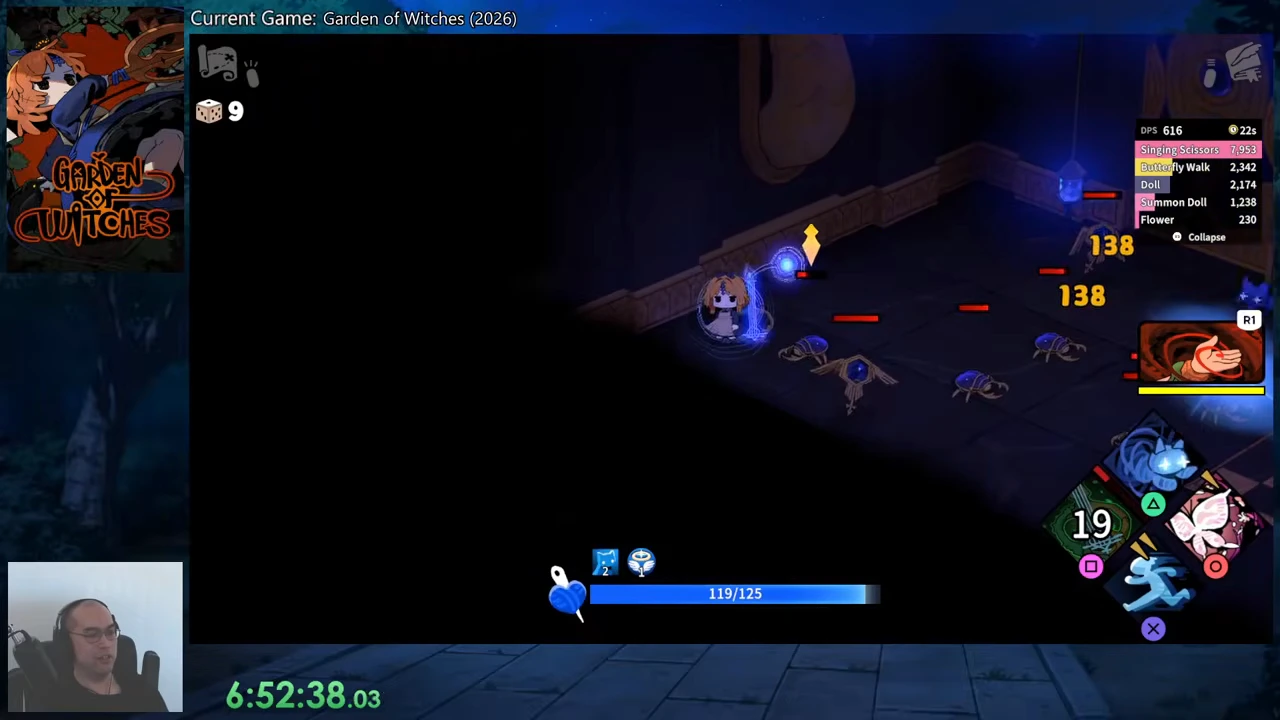
The recorded combat breakdown has separate entries for Butterfly Walk and Flower. In the image below, both entries have contributed, alongside Singing Scissors, Doll and Summon Doll. That is the useful check for this setup: casting the spell and triggering its Flower are different events.
Singing Scissors contributes the largest share in this example. This is a mixed ranged-and-Flower starting setup, not evidence that Flowers alone carry the run. The values in a single encounter are observations of that encounter; they are not base damage, a promised DPS result or a ranking against other builds.
The footage clears rooms and reaches the first return from the ruins, but it also shows damage taken and a low-health segment. It does not demonstrate an invulnerable rotation or a complete endgame Flower build.
Fix the specific failure before changing the whole setup
The starting configuration works before the later reward choices. Max Stack and Bone Earrings are optional branches: if they are absent, keep placing Flowers in enemy paths and use the support loop above.
| What you observe | What to change |
|---|---|
| Butterfly Walk appears in damage, but Flower does not | Place the next Flower where an enemy can actually step on it, then check the separate Flower damage row. |
| The enemy dies or leaves without crossing the Flower | Keep the ranged attacks working and place the next Flower for the next surviving target; do not count the early kill as a trap hit. |
| You spend the buff window waiting | Apply Mark and Swamp Echo when attacks can connect; do not spend their short windows waiting for an assumed trigger delay. |
| You take hits while holding the charge | Release or move out of the threatened area. Increased movement speed is not an invulnerability claim. |
| The weapon stops contributing | Check Singing’s loaded ammunition state; the recorded weapon begins with a 20-projectile load. |